Photoshop is equipped with an array of tools, filters, and masks that provide you with extensive control over the sharpness of an image.
Here are some strategies to decrease the blur in a photo using Photoshop:
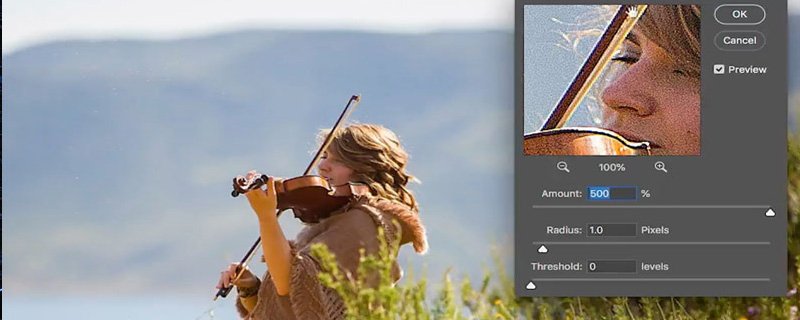
Method 1: By Using the Unsharp Mask
Originating from a darkroom technique used to enhance the sharpness of film photos, the Unsharp Mask filter works by identifying the edges of objects within an image and amplifying the contrast between the object and its surroundings.
How to Earn Money Online without Investment in Mobile
Transition to a Smart Object:
Begin by opening the blurry image in Photoshop and converting the layer to a smart object.
This step ensures that you can revisit and modify the filter at any time, making it a technique that doesn’t destructively edit your image.
Implement the Unsharp Mask Filter:
After converting the layer to a smart object, you can now apply the Unsharp Mask filter.
Modify the Amount Slider:
The first slider to adjust is the Amount slider. This enhances your photo’s contrast, creating the illusion of a sharper image.
Method 2: Applying Smart Sharpen
Smart Sharpen is a more advanced filter in Photoshop that offers a range of sharpening controls. It’s a step up from the Unsharp Mask filter, providing more flexibility and precision.

Open Your Image:
Start by loading your image onto the Photoshop canvas.
Duplicate Your Layer:
To preserve your original image, it’s a good idea to duplicate your layer before applying the Smart Sharpen filter. This way, you can always revert to the original if needed.
Apply the Smart Sharpen Filter:
Navigate to the ‘Filter’ menu in the main toolbar, then select ‘Sharpen’, and finally choose ‘Smart Sharpen’. This will open a dialog box with various settings you can adjust.
Adjust the Settings:
In the Smart Sharpen dialog box, you’ll find several options to fine-tune the sharpening effect.
The ‘Amount’ setting controls the overall strength of the sharpening effect.
The ‘Radius’ setting determines the size of the details that the sharpening is applied to.
Lastly, the ‘Reduce Noise’ setting helps to minimize any unwanted noise or grain that can be introduced during the sharpening process.
Preview and Apply:
As you adjust the settings, be sure to keep the ‘Preview’ checkbox enabled. This allows you to see the effect of the adjustments in real time. Once you’re satisfied with the sharpening effect, click ‘OK’ to apply the filter to your image.
Method 3: Minimizing Image Noise
Image noise can often appear as random variation of brightness or color information in images, and is usually an aspect of electronic noise.
It can be produced by the image sensor and circuitry of a scanner or digital camera. Photoshop provides tools to reduce this noise, enhancing the quality of your image.

Open Your Image:
Start by importing your image into Photoshop.
Access the Reduce Noise Filter:
Navigate to the ‘Filter’ menu on the top toolbar, then select ‘Noise’, and finally choose ‘Reduce Noise’. This will open a dialog box with various settings that you can adjust.
Adjust the Settings:
In the Reduce Noise dialog box, you’ll find several options to fine-tune the noise reduction effect.
The ‘Strength’ setting controls the overall intensity of the noise reduction.
The ‘Preserve Details’ setting helps to maintain the details in your photo while reducing noise.
The ‘Reduce Color Noise’ setting helps to minimize any unwanted color noise or grain that can be introduced during the noise reduction process.
The ‘Sharpen Details’ slider allows you to sharpen the details in your image after the noise has been reduced.
Preview and Apply:
As you adjust the settings, ensure that the ‘Preview’ checkbox is enabled. This allows you to see the effect of the adjustments in real time. Once you’re satisfied with the noise reduction effect, click ‘OK’ to apply the filter to your image.
Tips for Optimal Results
- Consider sharpening your image on a separate layer. This allows you to resharpen it later if you need to output it to a different medium.
- If you decide to sharpen your image on a separate layer, set the layer’s blending mode to Luminosity to prevent color shifts along edges.
- Be aware that sharpening increases image contrast. If you notice that highlights or shadows are clipped after you sharpen, use the layer blending controls to avoid sharpening in highlights and shadows.
- Aim to reduce image noise before sharpening to prevent the intensification of noise.
- Try sharpening your image multiple times in small increments.
Remember, the amount of sharpening required will vary depending on the quality of the digital camera or scanner used to capture or scan the image. It’s important to note that while Photoshop can enhance the sharpness of an image, it cannot correct a severely blurred image.
FAQs – Frequently Asked Questions
Q1. What is the Unsharp Mask filter in Photoshop?
Answer: The Unsharp Mask filter in Photoshop is a tool that enhances the contrast of an image to give the appearance of a sharper image. It’s based on a technique used in the darkroom to help sharpen film photos.
Q2. What is a Smart Object in Photoshop and why should I convert my image to it?
Answer:A Smart Object in Photoshop is a layer that contains image data from raster or vector images. It preserves an image’s source content with all its original characteristics, enabling you to perform nondestructive editing to the layer.
Q3. What is the difference between the Unsharp Mask filter and the Smart Sharpen filter?
Answer:While both filters are used to sharpen images, the Smart Sharpen filter provides more controls not available with the Unsharp Mask filter.
Q4. Why should I sharpen my image on a separate layer?
Answer: Sharpening your image on a separate layer allows you to resharpen it later to output to a different medium. It also helps to avoid color shifts along edges when the layer’s blending mode is set to Luminosity.
Q5. Can Photoshop correct a severely blurred image?
Answer: While Photoshop offers a variety of tools, filters, and masks that give you fine control over image sharpness, it’s important to note that sharpening cannot correct a severely blurred image. The degree of sharpening needed varies depending on the quality of the digital camera or scanner.